

Fence to Farm Table
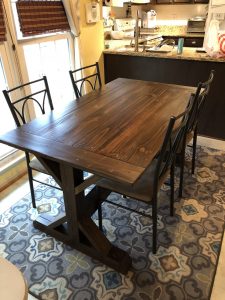
My wife has been wanting a farm table for some time and our kitchenette table has served us well, but is a boring round table. Since I have moderate wood working skills I decided to see if I could turn out a table that would meet her desires for as cheap as possible. I used some old wood we had laying around and cobbled together a decent looking table that now sits in our kitchenette.
About 14 years ago, when we bought our house, we had a 5′ dog ear fence installed on the rear of the property so our dogs could enjoy our backyard. We have about 1/3rd of an acre so the fence line was almost 375 feet. After it was installed we notice that we had a section that protruded too far forward and blocked a few of our neighbors home. We were lucky they were kind and I promptly had the fence company send out a few guys to re-angle the fence. This resulted in them removing 5 fence panel sections from the fence. The sections were thrown under our deck and have mostly just sat there.
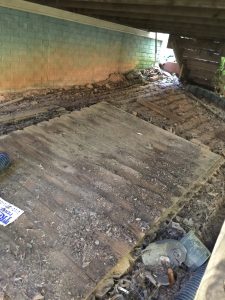
I have, from time to time, stolen a few boards from these sections to replace broken or warped ones on our fence, but mostly we still have a pile of pressure treated pine boards and 4x4s under our deck. I decided it would be kind of cool to take these out and use them as my base for building a farm table for my wife.

They were VERY dirty, but by dismantaling 3 sections I was able to cobble together a decent amount of boards, 4x4s and 2x4s. Next was to see if they would suit my needs. Some were cracked and others were simply too “gross” to be used, but all in all I was able to gather about 20 boards that I could use to form the surface of the table.
The legs and main uprights came from the 4x4s that served as fence posts and almost all of the 2x4s used in the project were the cross bars that held the
fence boards. I separated the wood under the deck since it was far too heavy and difficult to remove the entire sections alone.
As you can see the wood was far too dirty and had too much “funk” growing on it to be used as it was. So my next task was to get the wood cleaned up and prepped to be turned into a table.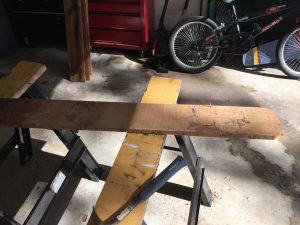
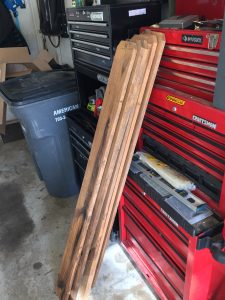
I started by dragging all of it around to my garage / workshop and pulled out every rusty nail I could find, one board at a time. For the larger 2x4s and 4x4s this was a chore, but for the boards they came out easily, I just had to be careful not to crack them as they are only 3/4″ thick.
Once I had nail free boards I took each piece out and washed them individually with a hose and scrub brush. I didn’t use any chemicals to clean them and really the water and scrubbing really did clean them up quite nicely.
 With the boards clean I started by notching and cutting down the 4x4s for the main feet. I used a circular saw to cut several thin cuts and then used a wood chisel to clean out the 4″ openings. I then cut two uprights with similar notch cut outs that would support the cross brace. As I went I mocked everything up. Next was the cross bar that would run between the two which was really just a straight cut 4×4. I modeled the design against a few different tables my wife had said she liked the look of. After all it was going to be her table so I was building it to her specs.
With the main support structure ruffed in I started trying to figure out how the main surface would be designed. I was originally going to do two layers of the fence boards, running in opposite directions. But after working the design a few ways, and consulting with my wife, she said she wanted a thinner look to the main surface.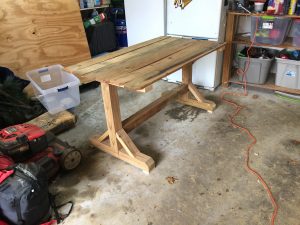
I settled on building a double layer surface anyways, but keeping the lower layer narrower and shorter than the top layer, this would give her the thinner look, but the stability of double layer. I mounted up the under layer to the cross beams, using the most sound but least attractive boards I had and started filtering through my remaining boards to pick out those that had the most character and color. I also decided I would put cap boards at the end of each side since I wanted the table to be 60″ long, but the fence boards were just shy of that and the dog ears would have to be removed to give them a finished look.
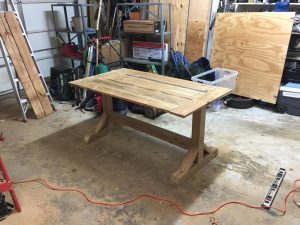 Having settled on my boards and caps I did a final mock up before screwing it all together. Once I had it all mocked up and was certain of the layout I went ahead and put it all together. At that point I noticed I had one board that was warped just enough that it wouldn’t settle into position. I solved this by putting a block between it and its neighbor and then screwing them together from below.
The last issue I came across was that the top was a bit too wobbly. To resolve this I added braces between the main uprights and the cross beams, which in my opinion really cleaned up the look since it then matched the lower portion where the uprights meet the feet. This also allowed me to really true up and level the surface.
After sanding down the main surface (I sanded the legs and other pieces as I went along the earlier steps) the table was looking good, but maybe a little too good. My wife wanted a distressed, farm table look and since the board were now all super smooth it was time to distress them a bit. I followed some tips from this article on Younghouselove.com to give the boards some character. I really liked the “Screws in a bag” method and the hammer, bolt and bar markings all came out really cool.
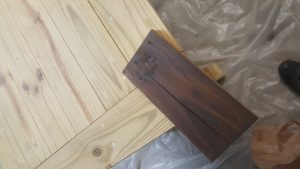 Now the table was ready for stain. I had picked up a nice honey color that I thought was what my wife wanted and just to be safe I tested it on a piece of scrap. I’m glad I did as it soaked into the board almost immediately and was much MUCH darker than the picture on the jar. After testing a different color I let my wife decide if she wanted the lighter or the darker color and she surprised me by choosing the original color, even though it looked quite dark.
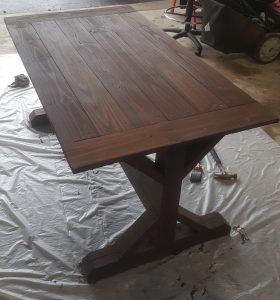 The staining process took me about 3 hours and used the entire quart of stain to do the whole table. I was worried I’d have to buy more and the stain would be uneven, but I was lucky and it came out quite nice.
I next was going to put a nice coating of glossy polycrylic on the table but my wife really liked the unfinished rough look so instead I picked up a quart of matte polycrylic as I couldn’t leave it unsealed since it would be our kitchenette table and we eat there 2-3 meals a day.
Thanks to a drop in temperature I had to now move the table into our basement so I could apply the polycrylic in a warmer environment. If you apply it in less than 50 degree weather you risk it turning white and drying that way. So off to the basement it and the drop cloth went. After allowing it to sit down there overnight, to warm up, I put on 3 coats of matte polycrylic which really warmed up the color of the table and brought out some of the detail in the boards, as well as accentuate the distressing I put into the surface.
All in all it was a project that probably could have been finished in a week, but thanks to my work schedule, family schedule, and general laziness it stretched out for a few months… But all good things come to those who wait and my wife was very patient waiting for her new table.

You May Also Like